Seasonal Tire Change — TIA RIST, On-Rim & Off-Rim
Use this page as a practical, technician-level reference for safe, consistent seasonal tire service. It covers TIA-aligned procedures for on-rim wheel swaps and off-rim mount/demount in a mobile setting, plus clear guidance on tire selection (winter vs. all-weather vs. all-season).
Safety first (applies to all procedures)
Work on a level surface; apply parking brake; use wheel chocks.
Verify the vehicle’s approved lift/jack points; use jack stands where appropriate.
Wear eye/hand protection; keep loose clothing and hair away from rotating equipment.
Inspect wheels/tires for cracks, bulges, exposed cords, bent flanges, and bead damage. Reject unsafe components.
Confirm load index, speed rating, and size match the vehicle requirements.
Use calibrated tools: torque wrench for final torque; tire inflation gauge for cold pressures.
Trajectory awareness: During inflation and bead seating, stand to the side—never in line with the sidewall.
A) On-rim seasonal change (wheel swap) — TIA-aligned process
This is the standard “winter wheel & tire package” swap (complete wheel assemblies).
Vehicle intake
Confirm customer complaint/request, wheel lock key, and any TPMS warnings.
Record existing tire positions and tread depths.
Pre-removal checks
Note wheel fastener type (stud/nut vs. bolt) and seat type (conical, ball, mag).
Break fasteners loose by hand if possible; never rely on impact for final torque.
Lift & remove
Lift at approved points; remove wheels. Inspect studs/bolts, hubs, and mating faces.
Clean hub face and wheel mating surface (remove rust/scale). Do not lubricate fastener threads or seats. A light film of anti-seize on the hub pilot (not the stud/seat) may be used to prevent corrosion bonding.
Inspect winter assemblies
Check DOT date, sidewall condition, valve stems/TPMS, and tread depth (winter tires lose effectiveness below ~4 mm).
Set pressures to the door-jamb placard (cold). Adjust for ambient temperature.
Install (TIA “RIST” Wheel-Installation Method)
R – Remove debris from mating surfaces and fasteners.
I – Inspect threads, seats, studs/bolts, and wheel fitment (hub-centric rings if applicable).
S – Snug fasteners in a star pattern using hand tools or a low-torque setting on a power tool.
T – Torque to the vehicle specification with a calibrated torque wrench in a star pattern.
Post-installation
Relearn/initialize TPMS as required (auto-learn, OBD, or stationary).
Set/recheck cold inflation; verify no interference or abnormal noises on a short roll.
Provide re-torque notice: re-check torque after 50–100 km of driving (owner responsibility). Sparky X can perform a mobile re-torque on request.
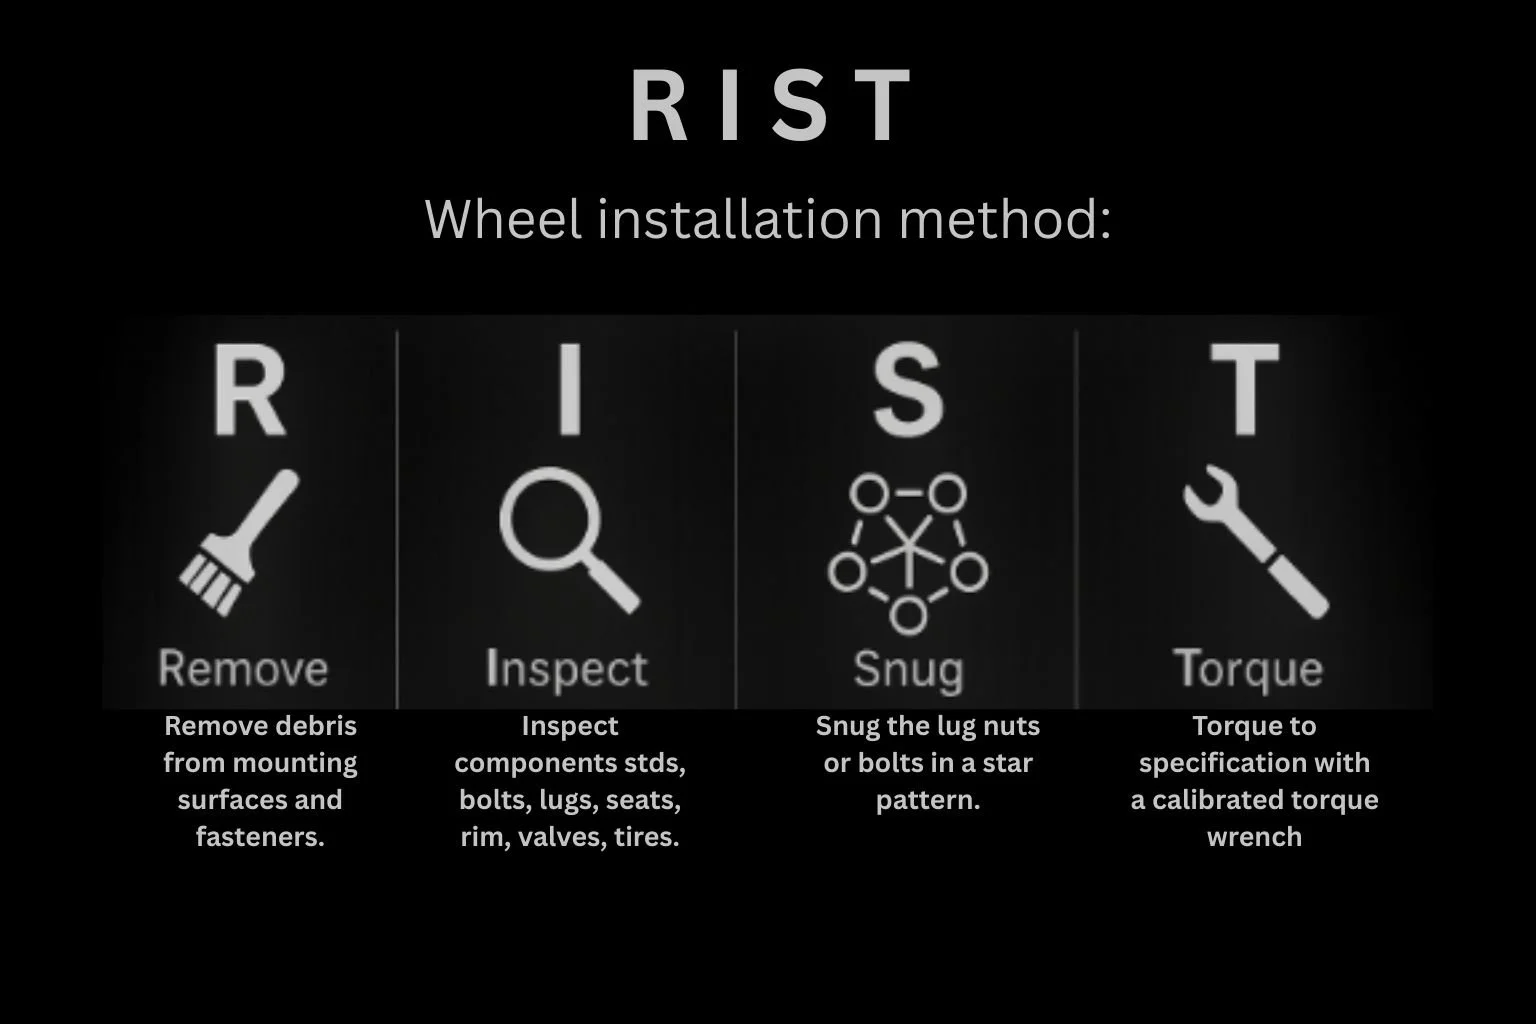
TRIST procedure explained: Remove debris | Inspect components | Snug lugs | Torque with torque wrench!
B) Off-rim tire change (mobile mount/demount & balance) — TIA-aligned process
Used when moving winter, all season, summer, or all weather tires onto existing rims or installing new tires on existing/new rims.
Intake & identification
Confirm tire size, load/speed rating, rotation direction, and TPMS system type.
Mark wheel position and rotation direction if re-using assemblies.
Deflation & TPMS service
Remove valve core; fully deflate.
If servicing TPMS, replace the service kit (grommet, valve core, seal, cap) per manufacturer.
Bead breaking
Break both beads using a controlled bead breaker; protect TPMS sensor position.
Note sensor location; demount opposite the sensor to avoid impact.
Demounting
Apply proper bead lubricant; demount upper and lower beads with correct tool angles to avoid bead damage.
Inspection
Inspect inner liner for penetrations/ply damage; inspect rim for cracks, bent flanges, corrosion at bead seats.
Clean bead seats; remove old weights and adhesive residue.
Mounting
Identify tire dots/marks:
Red dot (radial runout high point) → align with wheel low-point mark (if present).
Yellow dot (light point) → align with valve stem when no low-point mark exists.
Lubricate beads evenly (no excess). Mount lower bead first, then upper; avoid levering across the TPMS sensor zone.
Inflation & bead seating (safety critical)
Use a clip-on air chuck with an in-line valve and gauge; stand out of trajectory.
Never exceed the tire/wheel manufacturer’s maximum bead-seating pressure. If unknown, do not exceed 40 psi to seat; deflate to placard after seating.
For multi-piece or high-risk assemblies, use a restraining device or safety cage (not typical for passenger/light truck single-piece rims but maintain trajectory safety).
Balancing
Inspect for lateral/radial runout. Perform dynamic (dual-plane) balance where possible.
Use coated/adhesive weights appropriate for alloy; place behind spokes when feasible.
Installation on vehicle
Follow the same TIA RIST steps as Section A, including final torque and TPMS relearn.
Final checks
Verify pressures cold, TPMS light status, and no vibration on road test.
Provide re-torque notice (50–100 km).
Winter vs. All-Weather vs. All-Season — What to choose?
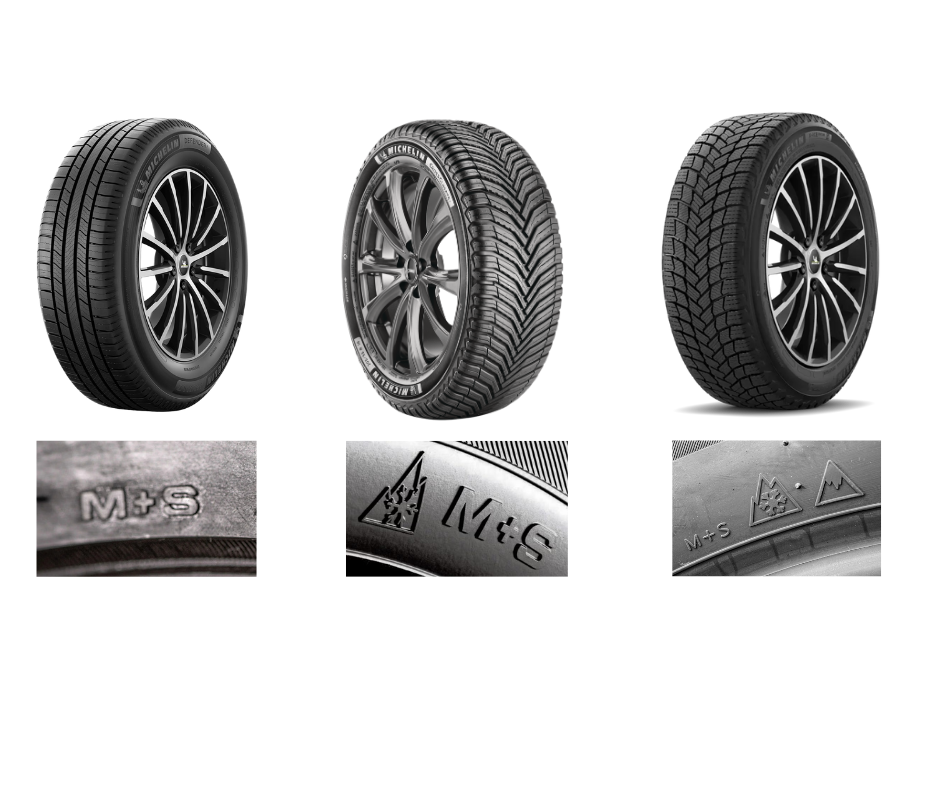
Key symbols
3PMSF (Three-Peak Mountain Snowflake): Certified severe-snow performance.
M+S: Basic mud/snow geometry designation; not a winter certification.
Winter (Snow) Tires
Best below ~7°C; specialized cold-weather compounds stay pliable.
Deep siping & aggressive edges for snow/ice traction.
3PMSF certified.
Cons: Softer in warm temps; faster wear in summer; typically higher rolling resistance.
All-Weather Tires
Year-round option that does carry 3PMSF; credible winter performance for milder winters.
Balanced compound/siping for cold plus acceptable summer manners.
Cons: Trade-off vs. dedicated winter in deep cold; can wear faster in hot climates compared to true all-season.
All-Season Tires
Optimized for spring/summer/fall; harder at low temperatures.
Usually no 3PMSF (some newer designs may carry it—verify).
Cons: Significantly reduced snow/ice performance vs. winter or all-weather in Canadian winters.
Quick guidance (Greater Toronto Area & similar climates)
Drive frequently in snow/ice or early-morning cold? → Dedicated Winter (with or without separate rims).
Mixed conditions, want one set year-round, accept some trade-offs? → All-Weather (3PMSF).
Mostly mild winters and limited snow driving (rare in GTA)? → Consider All-Weather rather than All-Season for added safety margin.
All season, all weather, and winter tires explained.
Winter vs. All-Weather vs. All-Season — Which should you run in Canadian winters?
| Tire Type | Certification | Strengths | Trade-offs | Best For (GTA) | Notes |
|---|---|---|---|---|---|
| Tire Type Winter (Snow) | Certification 3PMSF (severe-snow); often also M+S | Strengths Optimized < 7 °C; soft compound stays pliable; deep siping & edges excel on snow/ice; strong braking. | Trade-offs Faster wear in warm temps; usually more noise/rolling resistance; seasonal swap/storage required. | Best For (GTA) Regular snow/ice driving, early-morning commutes, hills or rural routes. | Notes Consider minus-one sizing (verify brake clearance); replace when tread < 4 mm for best winter grip. |
| Tire Type All-Weather | Certification 3PMSF (year-round option) | Strengths Credible winter traction with 3PMSF; good wet/cold manners; no seasonal swap needed. | Trade-offs Not as strong as dedicated winter in deep cold; can wear faster than all-season in hot summers. | Best For (GTA) One-set convenience with reliable winter performance for mixed urban/suburban driving. | Notes Rotate 8–10k km; watch load index on SUVs/EVs; monitor summer heat wear. |
| Tire Type All-Season | Certification Usually M+S only (verify if 3PMSF exists on specific model). | Strengths Quiet ride, long wear, efficient in mild temps; good for spring/summer/fall. | Trade-offs Markedly reduced snow/ice traction below 7 °C; longer braking distances in winter. | Best For (GTA) Drivers who park the vehicle in winter, or who run a dedicated winter set November–April. | Notes If used year-round in GTA, strongly consider switching to winters or all-weather for safety margin. |
3PMSF = Three-Peak Mountain Snowflake (certified severe-snow). M+S = Mud & Snow geometry (not a winter certification). Always set cold pressures to door-placard; expect ~1 psi drop per ~6 °C temperature drop.
Sparky X Mobile Tire Shop: We help you choose the right category, supply the tires/rims, and perform on-site mount/balance and installation with TIA-aligned procedures (including RIST torque method) and TPMS service. Mobile re-torque available on request.
Tire selection checklist (fitment & performance)
Size matches OE or approved plus/minus fitment (diameter within ~3%).
Load index & speed rating meet or exceed OE.
For SUVs/LTs carrying heavy loads: consider LT-rated tire options and adjust pressure accordingly.
Directional/asymmetric patterns installed correctly (rotation/inside-outside).
Consider a minus-one wheel size (smaller rim, taller sidewall) for winter to improve compliance and protection—verify brake clearance.
Tesla Model Y fitment & warranty advisory: Tesla lists only 19/20/21-inch factory wheel sizes for Model Y; 18-inch wheels are not an OEM size. Tesla’s manuals also say to use only Tesla-approved wheels/parts, and Tesla may decline warranty coverage for problems caused by non-Tesla parts. In practice, that means aftermarket 18s on a Model Y could risk denied coverage for related failures (e.g., wheel bearings/suspension/brake interference) if Tesla determines the wheels contributed to the issue. Confirm brake-caliper clearance (especially on Performance), load rating, offset, and overall diameter before installation.
Storage & marking
Mark positions on removal (e.g., LF/RF/LR/RR) and rotation plan for next season.
Store cool, dry, clean; away from ozone/UV sources (motors, heaters).
Bag tires to reduce off-gassing and ozone exposure; store upright on racks if mounted, stacked if unmounted (rotate stack periodically).
When to replace winter tires
Tread depth <4 mm: noticeable drop in snow/ice performance.
Visible damage (cuts, bulges, exposed cords) or bead tears → remove from service.
Age alone isn’t a pass/fail, but rubber hardens over time; inspect closely after 6 years and follow manufacturer guidance.
Common quality pitfalls to avoid
Final torque with an impact gun (do not).
Lubricant on fastener seats/threads (alters clamping force).
Skipping TPMS service kits when required.
Exceeding safe bead-seating pressure.
Ignoring hub/face corrosion leading to wheel loosening or runout.
Legal & local notes
Stud regulations, traction device rules, and winter-tire mandates vary by province/region. Check current local laws before recommending or installing studded tires.
Why choose Sparky X Mobile Tire Shop
TIA-aligned procedures: We always follow the TIA industry-recognized methods (including RIST) for safe, repeatable results.
Mobile convenience: Professional on-site service with calibrated tools and shop-grade equipment.
Fitment expertise: We verify size, load, TPMS, and torque specs before the job is complete.
Transparent standards: Clear re-torque policy, TPMS handling, and safety checks on every visit.
Need help choosing between winter and all-weather, or want a minus-one package with steel or alloy rims? We can spec, supply, mount/balance, and install everything on-site—start to finish.
Quick reference: star-pattern torque steps
Hand-start all fasteners (no cross-threading).
Snug in star pattern.
Lower vehicle to just contact the ground.
Final torque to spec in star pattern with a calibrated torque wrench.
Re-torque after 50–100 km.
TPMS refresher
Types: Direct (wheel sensors) vs. Indirect (ABS-based).
Relearn modes: Auto-learn, stationary (scan tool triggers), or OBD write.
Service: Replace service kits as required; never reuse damaged cores or seals; use nickel-plated cores with aluminum stems when specified by the sensor manufacturer.